
Page 849 - Tungaloy Catalog
P. 849
EZ Sleeve
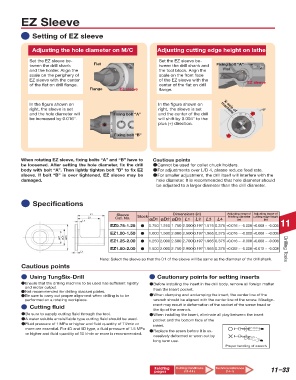
Setting of EZ sleeve
Adjusting the hole diameter on M/C Adjusting cutting edge height on lathe
Set the EZ sleeve be- Set the EZ sleeve be-
Flat Fixing bolt “A”
1.125 1.125 1.168 1.625 1.625 1.675 tween the drill shank tween the drill shank and Flat
and the holder. Align the the tool block. Align the
1.187 1.187 1.207 1.687 1.687 1.737 scale on the periphery of scale on the front face
1.250 1.250 1.258 1.750 1.750 1.778 EZ sleeve with the center of the EZ sleeve with the
EZ sleeve
of the flat on drill flange. center of the flat on drill
1.312 1.312 1.362 1.812 1.812 1.828
Flange EZ sleeve flange.
1.375 1.375 1.422 1.875 1.875 1.925
1.437 1.437 1.465 1.937 1.937 1.987
1.500 1.500 1.516 2.000 2.000 2.050 In the figure shown on In the figure shown on X-axis of
right, the sleeve is set right, the sleeve is set machine
1.562 1.562 1.637
and the hole diameter will Fixing bolt “A” and the center of the drill (+)
be increased by 0.016". will shift by 0.004" to the
plus (+) direction.
+0.4
+0.2
Fixing bolt “B” (-)
When rotating EZ sleeve, fixing bolts “A” and “B” have to Cautious points
be loosened. After setting the hole diameter, fix the drill ●Cannot be used for collet chuck holders.
body with bolt “A”. Then lightly tighten bolt ”B” to fix EZ ●For adjustments over L/D 4, please reduce feed rate.
sleeve. If bolt “B” is over tightened, EZ sleeve may be ●For smaller adjustment, the drill itself will interfere with the
damaged. hole diameter. It is recommended that hole diameter should
be adjusted to a larger diameter than the drill diameter.
Specifications
L1 Sleeve Dimensions (in) Adjusting range of Adjusting range of
L3 Cat. No. Stock finishing diameter cutting edge height
L4 øD1 øD2 øD3 L1 L2 L3 L4 (in) (in) 11
EZ0.75-1.25 ● 0.750 1.250 1.750 2.000 0.197 1.575 0.375 +0.016 ~ -0.008 +0.008 ~ -0.006
EZ1.00-1.50 ● 1.000 1.500 2.000 2.500 0.197 1.965 0.375 +0.016 ~ -0.008 +0.008 ~ -0.006
øD1 øD2 øD3
EZ1.25-2.00 ● 1.250 2.000 2.500 2.700 0.197 1.965 0.375 +0.016 ~ -0.008 +0.008 ~ -0.006
EZ1.50-2.00 ● 1.500 2.000 2.750 2.900 0.197 1.965 0.375 +0.022 ~ -0.008 +0.012 ~ -0.008 Drilling Tools
L2
Note: Select the sleeve so that the D1 of the sleeve will be same as the diameter of the drill shank.
Cautious points
Using TungSix-Drill Cautionary points for setting inserts
●Ensure that the drilling machine to be used has sufficient rigidity ●Before installing the insert in the drill body, remove all foreign matter
and motor output.
●Not recommended for drilling stacked plates. from the insert pocket.
●Be sure to carry out proper alignment when drilling is to be ●When clamping and unclamping the insert, the center line of the
performed on a rotating workpiece. wrench should be aligned with the center line of the screw. Misalign-
ment may result in deformation of the socket of the screw head or
Cutting fluid
the tip of the wrench.
●Be sure to supply cutting fluid through the tool. ●When installing the insert, eliminate all play between the insert
●A water soluble emulsifiable type cutting fluid should be used.
pocket and the bottom face of the
●Fluid pressure of 1 MPa or higher and fluid quantity of 7 l/min or
insert.
more are essential. For 4D and 5D type, a fluid pressure of 1.5 MPa
●Replace the screw before it is ex-
or higher and fluid quantity of 10 l/min or more is recommended.
cessively deformed or worn out by
long term use.
Proper handling of wrench
Relating Cutting Conditions Technical reference 11–33
pages (11-14 ) (14-1)